Craft Smorgasbord-Masking Tutorial | By Liz
Hi all, Liz here today, as you may know I am a Guest Designer for Swedish house Crafts and I want to show you a card and masking tutorial I have made using the fantastic Magnolia From Farm To Market collection by magnolia, which are available to Pre-order from Swedish House Crafts,

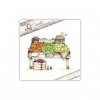
As you can see I have made a Farm Scene using three of the fabulous stamps and then I also did some hand drawing/ painting to finish my scene off,
So onto the Tutorial:

I used the Fruit stand stamp, Market Tilda with Fruits and the Tractor stamp then I used a Memento ink pad in London Fog for the masking (I find this colour washes off my stamp positioner easier when I need to clean them) and a Memento ink pad in Tuxedo Black for the stamped images, sorry this is not shown.

Take Market Tilda with Fruits and stamp using Memento Tuxedo Black Ink, stamp the image on your water colour paper making sure you have left plenty of room around her for the masking and to create your scene, as I have done

Then take the same Market Tilda with Fruits and stamp her onto a post it note or similar, anything which can be easily removable when needed will do, make sure part of the image is on the sticky/glue part so it will stick over your stamped image later, then fussy cut this image out, place the cut out image and place her over your stamped image on the water colour paper,

Place the Fruit Stand stamp onto your stamp block, ink it up London Fog ink and place onto your stamp positioner, making sure your stamping block fits into the top left angled corner of your stamp positioner as shown below,

Move your stamping block to one side for now, then place the stamped image that is now on your stamp positioner over the top of your Market Tilda With Fruits, which has also the masked image on too, at this stage you can move the stamp positioner around till you get it were you want it, I chose to place it slightly off centre, so you could see the fruits on either side and a piece of fruit showing between her boots, make sure your images are straight too, mine are here but the angle of the photography makes it look a little off,

When you have it were you want it, carefully remove the piece of your stamp positioner that has the image of the Fruit Stand on, then place your inked stamped image that is on your stamping block over the masked image of Market Tilda with Fruits, making sure you place the stamping block into the top left corner again as before,

This is what you will see with the stamping block removed, it is perfectly normal and correct for some of the stamped fruit stand to show on the mask, remove the mask, you can keep it for future use if you wish,

Here is the images masked together with the mask removed, as you can see some of the lines are a little faint, I simply went over with a fine Micron pen which wouldn't run when my water colour paints were added, you can of course just use these two images if you wish, but I wanted to use the tractor too,

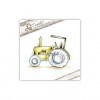
So I cleaned my Fruit Stand image off my stamp posistioner and in the same way as before stamped the Tractor onto it.

I wanted the Tractor to look like it was in a ploughed field and slightly to the back, so I moved it around on the stamp positioner until it looked like it was in the right place, I then again removed the image on the stamp positioner and inked up the Tractor stamp on my stamping block and placed it into the top left corner of the positioner again.

Here are the three masked images together with a little of my hand drawing for the attempted ploughed field.

I then added a paved path and painted my scene with my distress inks, I wanted it to look like it has some depth to the scene.

I added a few hand drawn/painted flowers and hedgerows to hopefully give some depth too.

To finish my card off, I added some fruit in her basket, and some flowers at the top from my stash,

I hope you have enjoyed my little Tutorial, do check out these and the other fabulous new Magnolia collections to Pre- order too, Have Fun!!
Check out my blog here for more tutorial and inspiration.
You can still pre-order this collection using the discounts in the shop, you can find below the stamps I used for this tutorial from the new collection: From Farm to Market. There are 3 collections including vintage dies.
Happy Crafting!!
Hugs Liz xx


As you can see I have made a Farm Scene using three of the fabulous stamps and then I also did some hand drawing/ painting to finish my scene off,
So onto the Tutorial:

I used the Fruit stand stamp, Market Tilda with Fruits and the Tractor stamp then I used a Memento ink pad in London Fog for the masking (I find this colour washes off my stamp positioner easier when I need to clean them) and a Memento ink pad in Tuxedo Black for the stamped images, sorry this is not shown.

Take Market Tilda with Fruits and stamp using Memento Tuxedo Black Ink, stamp the image on your water colour paper making sure you have left plenty of room around her for the masking and to create your scene, as I have done

Then take the same Market Tilda with Fruits and stamp her onto a post it note or similar, anything which can be easily removable when needed will do, make sure part of the image is on the sticky/glue part so it will stick over your stamped image later, then fussy cut this image out, place the cut out image and place her over your stamped image on the water colour paper,

Place the Fruit Stand stamp onto your stamp block, ink it up London Fog ink and place onto your stamp positioner, making sure your stamping block fits into the top left angled corner of your stamp positioner as shown below,

Move your stamping block to one side for now, then place the stamped image that is now on your stamp positioner over the top of your Market Tilda With Fruits, which has also the masked image on too, at this stage you can move the stamp positioner around till you get it were you want it, I chose to place it slightly off centre, so you could see the fruits on either side and a piece of fruit showing between her boots, make sure your images are straight too, mine are here but the angle of the photography makes it look a little off,

When you have it were you want it, carefully remove the piece of your stamp positioner that has the image of the Fruit Stand on, then place your inked stamped image that is on your stamping block over the masked image of Market Tilda with Fruits, making sure you place the stamping block into the top left corner again as before,

This is what you will see with the stamping block removed, it is perfectly normal and correct for some of the stamped fruit stand to show on the mask, remove the mask, you can keep it for future use if you wish,

Here is the images masked together with the mask removed, as you can see some of the lines are a little faint, I simply went over with a fine Micron pen which wouldn't run when my water colour paints were added, you can of course just use these two images if you wish, but I wanted to use the tractor too,

So I cleaned my Fruit Stand image off my stamp posistioner and in the same way as before stamped the Tractor onto it.

I wanted the Tractor to look like it was in a ploughed field and slightly to the back, so I moved it around on the stamp positioner until it looked like it was in the right place, I then again removed the image on the stamp positioner and inked up the Tractor stamp on my stamping block and placed it into the top left corner of the positioner again.

Here are the three masked images together with a little of my hand drawing for the attempted ploughed field.

I then added a paved path and painted my scene with my distress inks, I wanted it to look like it has some depth to the scene.

I added a few hand drawn/painted flowers and hedgerows to hopefully give some depth too.

To finish my card off, I added some fruit in her basket, and some flowers at the top from my stash,

I hope you have enjoyed my little Tutorial, do check out these and the other fabulous new Magnolia collections to Pre- order too, Have Fun!!
Check out my blog here for more tutorial and inspiration.
You can still pre-order this collection using the discounts in the shop, you can find below the stamps I used for this tutorial from the new collection: From Farm to Market. There are 3 collections including vintage dies.
Happy Crafting!!
Hugs Liz xx


0 comments
If you want to make someone happy today, what would you say? Leave a word to the team :D